Monday, April 19, 2010

April 2010 Work Weekend

The work weekend started a few days early for a few of the MCRR volunteers.

While awaiting the 6's boiler, numerous hours have been invested in the D-9. If you scan through the previous blog entries you will see what progress has been made.

To summarize what has transpired, starting about this time last year, the sheet metal and various parts surrounding the engine and torque converter were removed. During the summer of 2009, the engine/TC was removed and the innards of the torque converter were placed into the new crack-free housing. During the 2009 Old Threshers' Reunion, when the engine/TC was installed and tested, another leak was discovered that, unfortunately, requires R&R of the engine/TC unit. (Plans are afoot to repair that leak; we should see the D-9 moving under its own power fairly soon.) Meanwhile, an idle volunteer sandblasted nearly all the loose D-9 parts and others started the paint removal and refurbishment of the cab. In November, 2009, the loose parts were primed. During the last few months, the rotted sheet metal on the cab has been replaced and the installation of a train brake system was started.

So what happened to it this month? The cab repairs were completed and the air brake system was completed. Plus..."Bad Kitty" attacked, as shown here, leaving her signature portrait on the sides and rear of the engine!


As one might expect, tinkering with the air brakes didn't require the expertise of everyone, so other things did occur.

A large number of conductors and ticket sales personnel met Saturday morning to clean the 2009 North Pole Express remnants out of the South Station and the coaches. The next few pictures show the coaches being from Museum B and the South Station to a spot outside the South Station. This gave the staff plenty of light to see what needed cleaning and repair.

No pictures or details of exactly what was accomplished at or around the South Station can be given here; this reporter was busy in the shop (and fooling around at the Mt Pleasant airport!) and was unable to document what was happening "over there." Perhaps someone with the coaches was taking pictures and can supply them and text for me to insert into this blog entry.


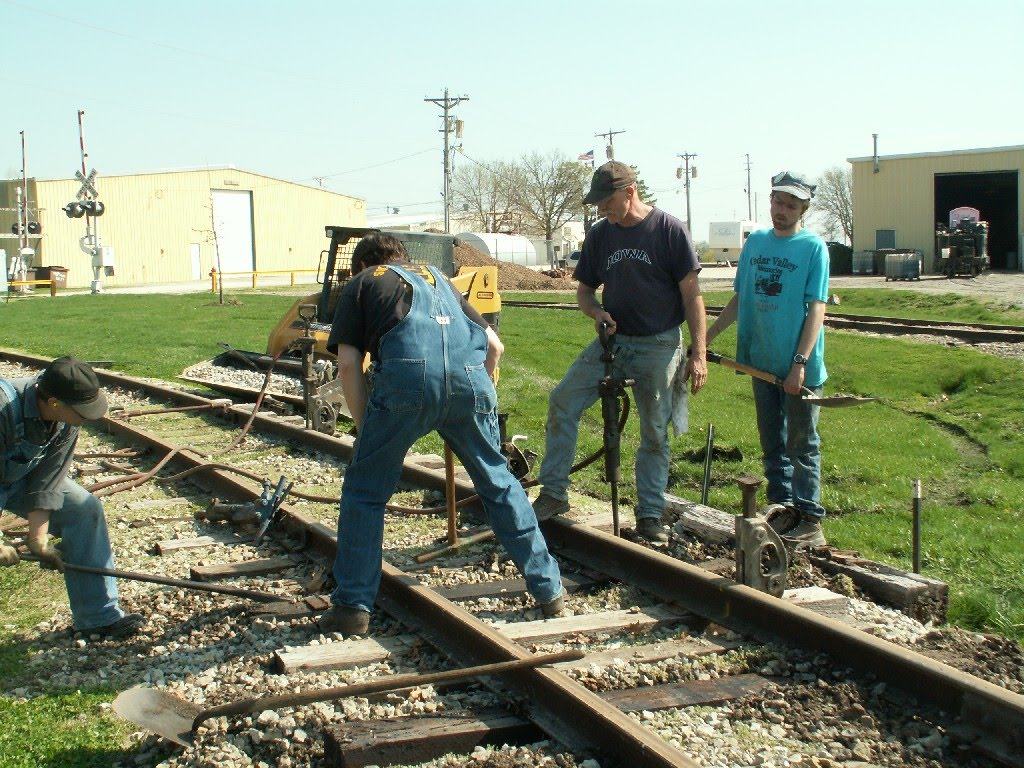
Outside the shop, along the mainline tracks west of the road, a group of volunteers corrected a long-forming problem: the rails had developed a negative camber, with the outside rail lower than the inside rail.

What should have been a "quick" project turned out to last long after nightfall. Besides needing to jack the ties and rails, a large number of ties needed to be replaced.

Replacing (spotting) ties has been made much easier than ever before with the special bucket on the Case backhoe. The bucket is exactly the width of a tie and with two strokes the old tie is knocked out and a new tie pushed into place. Contrast that with using the skid-steer, chains, and tie-tongs!

The next bunch of pictures show the staff moving the ties about, spiking the rails to the ties, and tamping the ballast into place.

Long time volunteer Chris C is shown using the pneumatic ballast tamper in the next two photos.


Volunteer John W holds up a shovel as the others do all the work.


Griffin walks between the matt-tractor loaded with ties and ties laying on the ground.


John W holds a rail in place while Griffin moves some ballast out of the trench where the new tie will be tucked into place.


Trying to decide what happens next.


The special bucket is clearly shown on the Case backhoe. The bucket has an official railroad name but I haven't a clue what it might be.


Dustin B and Chris C watch as Griffin skillfully moves a tie under the rail with the Case backhoe.


That's Griffin carefully manipulating the controls of the Case backhoe.


Brian B (squatting) and Dustin B watch intently as Chris C pries the end of the tie in place.


A few more nudges with the bucket and the tie is ready for spiking.


Dustin B taps the tie plate square with the tie before spiking.


Dustin B has a few words with the Case backhoe operator.


Brian B lifts the rail so Dustin can get the tie plate under the rail.


The Plymouth switcher 14 basks in the sun.


John W, Jerry C, Lindsay R and Lindsay's aunt (yikes! her name escapes me at this second!) chit chat outside the South Station.


Back at the track project, Chris C pounds a spike into place.


Apparently untrustworthy with a large hammer, Brian B starts a spike in the tie with a tiny hammer.


Chris C uses a pneumatic ballast tamper to pound the material under the tie.


As the tamper pushes ballast under the tie, additional ballast must be shoveled into the hollowed out space. Each tamper operator requires the full time service of a ballast shovel operator.


His work complete at the South Station, John W walks to the track project site.


Director Dave R pilots the fork lift back into the shop.


-steam.airman

Wednesday, March 24, 2010

March 2010 Work Weekend

This month's work weekend had two primary projects being performed.

1. Cleaning various parts for the #6 in preparation of its boiler's return to the MCRR shop.
2. Cab work and train brake installation on the D-9 Plymouth diesel switch engine.

The boiler repair for the #6 is almost complete. On the days following the first weekend of March, five MCRR volunteers (Mike E, Don E, Dave O, Dan H, and Griffin W) traveled to the boilermaker's shop and installed the flues. Most (if not all) of the stay bolts have been installed and many still need to be welded. The boilermaker has a few other items to complete before the boiler can be delivered to the MCRR. Everyone at the MCRR is anxious to start the 6's reassembly.

In anticipation of the boiler's return, various mini-tasks have been started and some have been completed (see the February 2010 blog entry).

The next picture shows Eric C cleaning the new (well, new to the 6) hydrostatic lubricator. The previous hydrostatic lubricator was "problematic" and replacing it was an easy decision. The MCRR has numerous hydrostatic lubricators on the shelves awaiting installation in a locomotive.


Eric C and Abe C, along with Shop Supervisor Mike E take apart the new hydrostatic lubricator for cleaning and inspection.


Various parts are being cleaned and sandblasted. The sandblasting of the parts will remove any baked grease or other pieces of junk that might have been on the part.

Brian B and Dallas K clean the 6's firebox ash pan, removing bits of firebrick and other bits of detritus. While the following picture looks like an amateur art welder's version of a duck, the assembly is actually the firebox. The plate sticking up in front is the draft door.


The firebox door's frame is being inspected after being sandblasted.


Bill W. is cleaning one of the two the brake cylinders which pushes the brake shoes against the wheels, similar to the brakes in a car.

In the background is Kim Weaver cleaning the mechanical lubricator.

Together, the mechanical lubricator and the hydrostatic lubricator provide the correct amount of steam cylinder oil.


Steve R cleaning the regulators for 6's air brakes.


Dustin B chats with Griffin W and Brian B from the cab of the Plymouth D-9 switch engine.


-John G (aka STEAM9)

Monday, March 1, 2010

February 2010 Work Weekend

Unlike January when the snow soured everyone's enthusiam, the snow didn't stop the volunteers from acheiving a few items.

Every firemen that has greased the 6 should recall that one of the driver wheels and one of the pilot truck suspension grease fittings refused to take grease. Those problems have been resolved! Elliot H. and shop supervisor Mike E. fixed both problems. The reason for the inability to pump grease is rather curious and nothing more will be mentioned here.

The many years of going clockwise around the layout in McMillan Park caused the left pilot wheel to wear the flange to a precarious profile leaving the right pilot wheel "as new." With the boiler off the frame, the staff decided to flip the axle placing the "good" wheel on the left side.

Rather than pick the frame up high enough to roll the axle out from the frame, the workers choose to remove the pilot ("cow catcher?") and then remove the axle. With the pilot out of the way, the frame needed to be lifted about a foot versus almost three feet with the pilot in place.

The next few pictures show the front of the 6's frame with the pilot removed.


Shop Super Mike E, Dustin B, and Griffin W discuss the removal of the pilot axle.


With the frame lifted, the axle is ready to be rolled out of its normal position.


A common scene at the MCRR: volunteers discussing the next move.


The bearing boxes from the pilot axle were cleaned for inspection. There was substantial wear on the thrust surfaces but the brass bearing journals were in excellent condition.


Brian B, Dustin B, and Dick D flip the axle, placing the good wheel on the left side of the frame.


Dustin B performs a final inspection of the axle before the bearings are replaced and the axle is rolled into place.


Dustin cleans the frame member that holds the bearing journals in place.


The journals have two areas that contain cotton waste -- a "stringy" mass that holds oil. The oil then drips through a small hole onto the axle keeping it from drying out. Brian B thoroughly soaks a mass of cotton waste before placing it inside the journal box.


Several long bolts hold the pilot in place. Dick D cleans the years of rust off the bolt readying it for installation.


Dick D guides the pilot into place.


Tightening one of the many bolts that hold the pilot in place.


While the 6 repair was being completed, Dustin, Griffin and John (in the background) did some body work on the D-9's cab. Here, Griffin is painting a section of metal about to be welded in place.


After the welding is complete, Dustin grinds the weld smooth.


Griffin cuts some additional material out of the D-9's left side.


Body work is complete.


-steam.airman